Configuring Microsoft Credentials
The Microsoft Management Settings extension allows you to configure Microsoft credentials for a particular marketplace. In this section you will learn how to:
Note:
- To manage credentials in the Microsoft Management Settings extension, it is first necessary to configure a redirect URI.
Configuring Microsoft Credentials for a Marketplace
-
Open the Integrations module in the CloudBlue Connect Distributor portal.
-
If the Microsoft Management Settings extension is not installed yet, refer to the Installing the Microsoft Management Settings section.
-
If the extension is already installed, click on it and then click Open Settings.

Note: If the extension is already installed, you can also find it in your account settings (Settings > Microsoft Management Settings).
-
Click the Credentials tab.

-
Click Add Credentials and provide the required information in the following fields:

-
Environment: Select the environment (Test or Production).
-
Product: Select the corresponding Microsoft product.
-
Marketplace: Select the marketplace for which you wish to configure the credentials. Only the available marketplaces available to you as a distributor will be displayed.
-
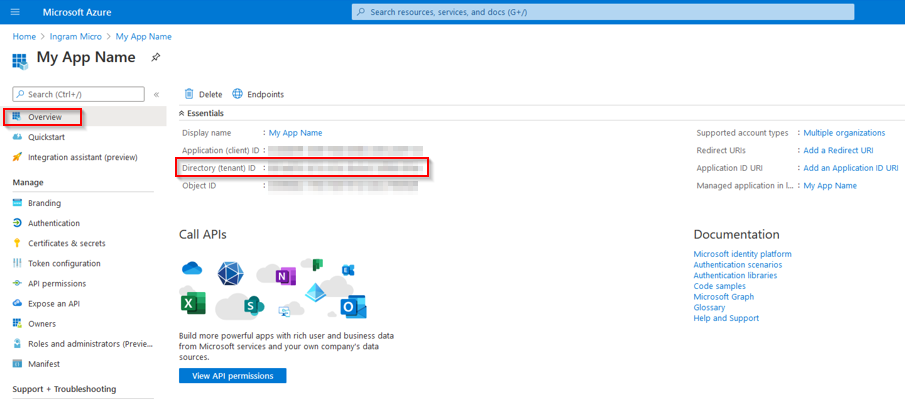
Tenant ID: Configure the required partner tenant ID to be used in a production environment for the corresponding marketplace. You can find this ID in the Overview section of the Azure app.
-
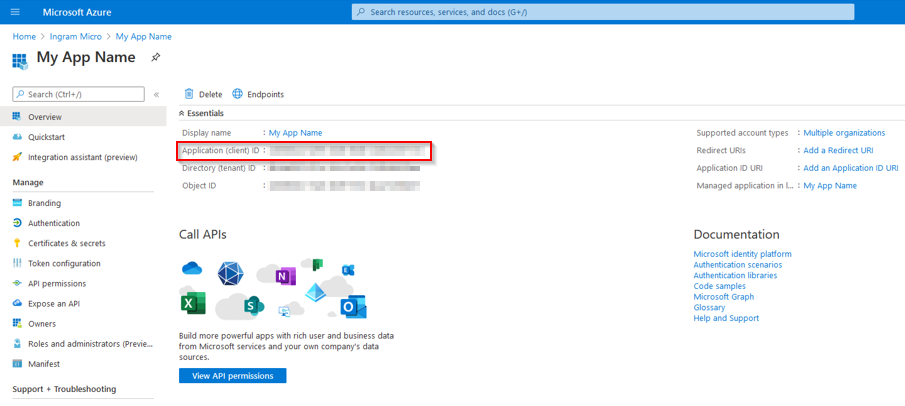
Client ID: Configure the required partner client ID for the corresponding marketplace. This is also known as Application (client) ID. You can find this ID in the Overview section of the Azure app. This field must be left blank for the CPV model.
-
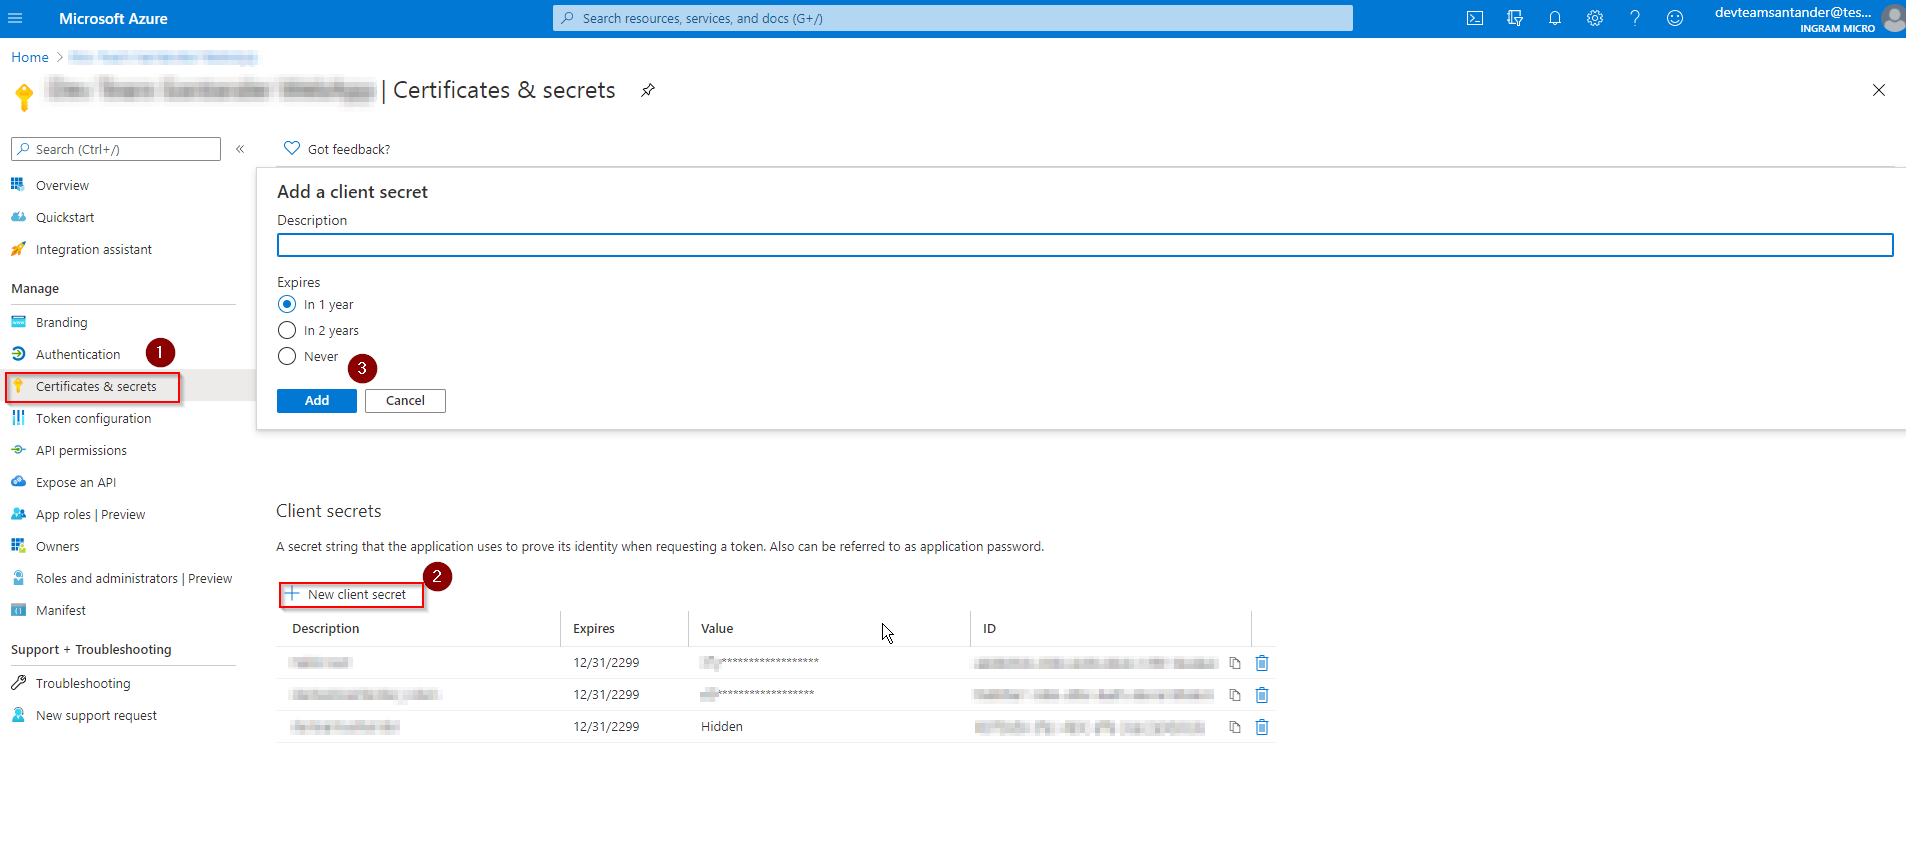
Client secret: Client secret to be used in a production environment. The client secret must be generated in the Azure portal. To do this, go to the Azure Connect application and click Certificates & Secrets > New Client Secret. This field must be left blank for the CPV model.
-
-
When clicking Save you will be redirected to the Microsoft website where you will need to log in. Then, wait until the process is completed.
-
If the process is completed successfully, the status will become Active.
The credentials for the Test and Production environments will be displayed in corresponding tabs at the top.
Editing the credentials
If you need to edit the Microsoft credentials for a particular marketplace, you can do so by completing the following steps:
-
Open the Microsoft Management Settings extension (Settings > Microsoft Managements Settings).
-
Click the Credentials tab and then click on the row corresponding to the credentials that you would like to edit.
-
Click Edit and enter the new required credentials (tenant ID, client ID and client secret).
-
When clicking Save, you will be redirected to the Microsoft website where you will need to log in. Then, when the process is completed, a new refresh token will be generated and the new credentials will become active.
Requirements for Generating a Refresh Token
The following requirements must be met for a user to be able to generate the refresh token successfully:
-
The Azure application must be added to the AdminAgents group in the Azure Active Directory.
-
The user who generates the refresh token must be an owner of the Azure application.
-
MFA must be enabled for the user who generates the refresh token.
Configuring a User as the Azure Application Owner
The user who generates the refresh token must be an owner of the Azure application. To do this, complete the following steps:
-
Navigate to App registrations in the Azure portal and select your application.
-
In the left-hand sidebar, under the Manage section, click Owners.
-
Click Add owners from the top toolbar.
-
Search for the user, select their name, and click Select to save.
Adding the Azure Application to the AdminAgents Group
The Azure application must be added to the AdminAgents group in the Azure Active Directory. To do this complete the following steps:
-
From the Azure main menu, navigate to Microsoft Entra ID (formerly Azure Active Directory).
-
Select Groups from the left-hand menu and search for the AdminAgents group.
-
Open the group and click Members > Add members.
-
Important: Search for your Application Name and click Select to add it.
Enabling MFA Authentication
MFA must be enabled for users who generate the refresh token. Please note that you will only be able to enable MFA for other users if you have the Global Administrator role.
Make sure that you have a Global Administrator role and follow these steps to enable MFA for users who will be generating a refresh token:
-
Navigate to Users > All users.
-
Click Per-user MFA in the top navigation bar (this may open a new browser tab).
-
Find the user who will generate the refresh token.
-
Check the box next to their name and select Enable under the Quick steps section on the right.
Validating or Generating the Refresh Token
To validate if the refresh token is valid, complete the following steps:
-
Open the Microsoft Management Settings extension (Settings > Microsoft Managements Settings).
-
Click the Credentials tab and then click on the row corresponding to the credentials whose refresh token you would like to generate or validate.
-
Click the ellipsis icon in the top-right corner. Then, choose one of the available options:
-
Validate: Click this option to validate the status of the refresh token.
-
Generate token: Although there is a periodic task in charge of generating a new refresh token before it expires, in some cases it may be necessary to generate the refresh token manually. For example, this may be the case if you changed the application permissions. In such cases, the previous refresh token will no longer be valid, so you will have to generate a new one by using this option. When using this option, you will be redirected to the Microsoft website, where you will need to log in for the new refresh token to be generated.
-